 unixwerk
VIO Server Howto
Contents
IOS - Information and Maintenance
Virtual Devices: Storage
- List unmapped disks
- List all Disk Mappings
- Create a Virtual SCSI Host Adapter
- Remove a Virtual SCSI Host Adapter
- Assign a Disk/LV to a Virtual SCSI Host Adapter
- Unassign a Disk/LV from a Virtual SCSI Host Adapter
Virtual Devices: Fibre Channel
- Create a Virtual Fibre Channel Adapter
- List Virtual Fibre Channels
- List NPIV Capable Ports
- Assign a Physical FC Adapter to a Virtual Fibre Channel Adapter
- Unassign a Physical FC Adapter from a Virtual Fibre Channel Adapter
Virtual Devices: Network
- List Shared Ethernet Adapters
- Create a Shared Ethernet Adapter
- Enable SEA Load Sharing Mode
- Perform a Manual SEA Failover
- Show SEA Satus
- List Links on Physical Ethernet Adapters
- Set a local IP Address
- Remove a local IP Address
1. Run IOS commands as root
According to IBM you should never work as root on VIO servers. However, if you login as user padmin and type
oem_setup_env
you get the root credentials (without even been asked for a password).
By default the ioscli commands are not available for the root user. All ioscli commands are in fact calls of /usr/ios/cli/ioscli with the command as argument. You see this if you list the aliases of the padmin user.
Knowing this you can use all ioscli commands as user root by appending /usr/ios/cli/ioscli. Instead of »lsmap -all« you would type
root@vios# /usr/ios/cli/ioscli lsmap -all
If you set an alias
alias i=/usr/ios/cli/ioscli
you could even type
root@vios# i lsmap -all
2. What is the AIX command behind an ioscli command?
If you want to know what AIX command is behind the command you issued as user padmin you can use a special debug mode:
$ export CLI_DEBUG=33
That's the output of the lsnports command in this mode:
 $  lsnports
 AIX: "/usr/lib/methods/viosmgr -t npiv -f query_fc_ports >/dev/null"
 name             physloc                        fabric tports aports swwpns  awwpns
 fcs0             U789C.001.DQDH231-P1-C2-T1          1     64     64   2048    2047
 fcs1             U789C.001.DQDH231-P1-C2-T2          1     64     62   2048    2043
IOS - Information and Maintenance
1. List all ioscli commands
$ help
You can type
$ help <command>
to display a command's syntax, e.g
 $ help lsmap
Usage: lsmap {-vadapter ServerVirtualAdapter | -plc PhysicalLocationCode |
             -all} [-type BackingDeviceType ... | -net | -npiv ]
             [-field FieldName ...] [-fmt delimiter]
       lsmap -ams {-vtd PagingDevice | -all}
             [-type BackingDeviceType ... ]
             [-field FieldName ...] [-fmt delimiter]
       lsmap -clustername ClusterName {-all | -hostname}

       Displays the mapping between physical and virtual devices.

       -all          Displays mapping for all the server virtual adapter
                     devices. Defaults to VSCSI adapter devices.

       -clustername  Specifies the cluster name.

       -hostname     Specifies the host name.

       -vadapter     Specifies the server virtual adapter device
                     by device name.

       -plc          Specifies the server virtual adapter device
                     by physical location code.

       -vtd          Specifies the (AMS)Active Memory Sharing
                     Paging Device to be displayed.

       -type         Specifies to display virtual devices whose backing
                     device matches the type given.

       -net          Specifies supplied device is a virtual server
                     Ethernet adapter.

       -npiv         Displays NPIV binding information.

       -ams          Displays (AMS)Active Memory Sharing paging space
                     device information.

       -field        Specifies a list of fields to be displayed.

       -fmt          Divides output by a user-specified delimiter.
2. IOS Version
 $ ioslevel
 2.2.0.10-FP-24
3. Apply IOS Fixes
Put the IOS fixes somewhere in a local directory or on an NFS server (e.g. /mnt/iosfixes). Then run
$ updateios -dev /mnt/iosfixes -accept
4. IOS Upgrade Procedure
It is highly recommended first to clone the running installations to free disks (here: hdisk2 and hdisk3). That way we can always go back to the old working installation:
 $ oem_setup_env
 # alt_disk_copy -B -d "hdisk2 hdisk3"
 # exit
Read the release notes. You may need to upgrade the VIO server in two steps (e.g. first to 2.2.2.1 and than further to 2.2.2.5).
Then put the IOS upgrade packages somewhere in a local directory or on an NFS server (e.g. /updates/2.2.2.5) and run
 $ updateios -commit
 $ updateios -dev /updates/2.2.2.5 -accept -install
 $ shutdown -restart
5. Reboot the VIO Server
$ shutdown -restart
Virtual Devices: Storage
1. List unmapped disks
 $ lspv -free
 NAME            PVID                                SIZE(megabytes)
 hdisk24         none                                8631
 hdisk25         none                                8631
 hdisk26         none                                8631
 hdisk27         none                                8631
 Warning:
If you use vendor specific device drivers (such as the SDD or EMC drivers) you see all
hdisks as free. You have to limit the list to your logical devices, e.g.
Warning:
If you use vendor specific device drivers (such as the SDD or EMC drivers) you see all
hdisks as free. You have to limit the list to your logical devices, e.g.
$ lspv -free | grep vpath
2. List all Disk Mappings
 $ lsmap -all

 SVSA            Physloc                                      Client Partition ID
 --------------- -------------------------------------------- ------------------
 vhost1          U9117.570.65E12FB-V1-C102                    0x0000000a

 VTD                   vtscsi1
 LUN                   0x8100000000000000
 Backing device        hdisk6
 Physloc               U7879.001.DQDHXYN-P1-C4-T1-W50050763041302AA-L4021400000000000

 VTD                   vtscsi8
 LUN                   0x8200000000000000
 Backing device        hdisk14
 Physloc               U7879.001.DQDHXYN-P1-C4-T1-W50050763041302AA-L4031400100000000
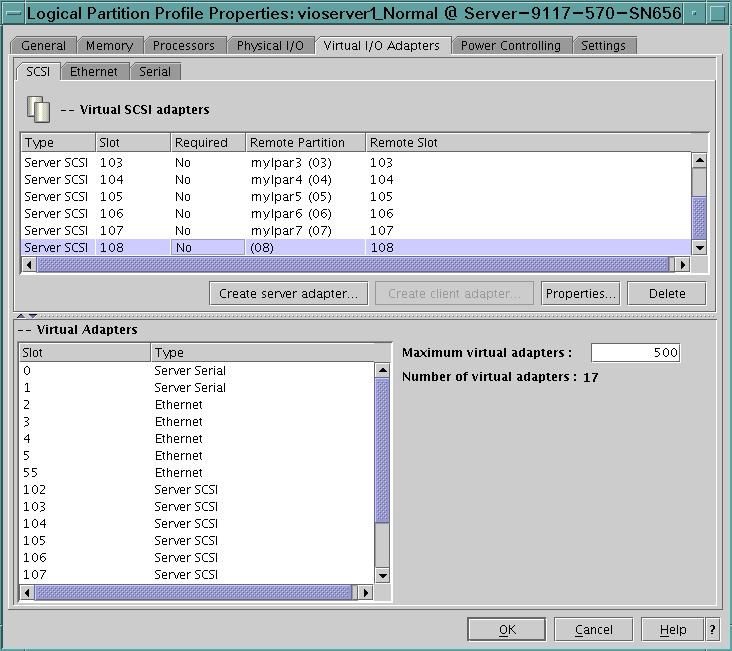
3. Create a Virtual SCSI Host Adapter
This has to done on the HMC for the profile of the VIO server: You create a new Virtual SCSI Host-Adapter and assign it only to your client LPAR.
The same slot ID should then be assigned to a new client adapter in the client LPAR's profile.
You can do these steps dynamically to avoid a restart of the VIO server. Use the Dynamic Logical Partitioning option for that. If you go for the dynamic option don't forget to do the same assignments in the profiles aswell, otherwise your LPAR loses all storage after a new start of the VIOS!
After dynamically adding the server hostadapters you have to rerun the configuration mamager before you can see the new vhost device:
$ cfgdev
4. Remove a Virtual SCSI Host Adapter
$ rmdev -dev vhostX [ -recursive ]
The option »-recursive« can be used to remove all still attached child devices.
Then remove the adapters dynamically from the VIO server aswell as from the VIOS' profile.
5. Assign a Disk/LV to a Virtual SCSI Host Adapter
To map hdisk22 to vhost1 just type
 $ mkvdev -vdev hdisk22 -vadapter vhost1
  vtscsi19 available
The VIO server assigns the next free number (19 here) and creates the mapping device vtscsi19. But you can specify your own name for the mapping device by making use of the »-dev« option:
 $ mkvdev -vdev hdisk22 -dev vthdisk22_barney -vadapter vhost1
  vthdisk22_barney available
If you use LVs rather than whole disks or LUNs the same rules apply:
# default mapping device$ mkvdev -vdev lpar21_lv03 -vadapter vhost1 vtscsi19 available# custom mapping device$ mkvdev -vdev lpar21_lv03 -dev vtdisk21_lv03 -vadapter vhost1 vtdisk21_lv03 available
6. Unassign a Disk/LV from a Virtual SCSI Host Adapter
$ rmvdev -vtd vtscsiXX
Virtual Devices: Fibre Channel
IBM introduced the support of NPIV technology with VIOS (Virtual I/O Sever) 2.1 with a client AIX running either AIX 5.3 TL9 or later, or AIX 6.1 TL2 or later, or AIX 7.1. Earlier releases are not supported.
1. Create a Virtual Fibre Channel Adapter
This has to done on the HMC for the profile of the VIO server: You create a new Virtual Server Fibre Channel adapter and assign it to only one client LPAR.
The same slot ID should then be assigned to a new Client Fibre Channel adapter in the client LPAR's
profile.
2. List Virtual Fibre Channels
$ lsmap -all -npiv
Name          Physloc                            ClntID ClntName       ClntOS
------------- ---------------------------------- ------ -------------- -------
vfchost0      U8203.E4A.05A6DD1-V1-C41                3 mylpar6        AIX

Status:LOGGED_IN
FC name:fcs1                    FC loc code:U789C.001.DQDH231-C3-T2
Ports logged in:2
Flags:a<LOGGED_IN,STRIP_MERGE>
VFC client name:fcs0            VFC client DRC:U8203.E4A.05A6DD1-V3-C41-T1

Name          Physloc                            ClntID ClntName       ClntOS
------------- ---------------------------------- ------ -------------- -------
vfchost1      U8203.E4A.05A6DD1-V1-C43                4 mylpar8        AIX

Status:LOGGED_IN
FC name:fcs1                    FC loc code:U789C.001.DQDH231-C3-T2
Ports logged in:2
Flags:a<LOGGED_IN,STRIP_MERGE>
VFC client name:fcs0            VFC client DRC:U8203.E4A.05A6DD1-V4-C43-T1
3. List NPIV Capable Ports
NPIV = N_port ID Virtualization
$ lsnports
name             physloc                        fabric tports aports swwpns  awwpns
fcs0             U789C.001.DQDH231-P1-C2-T1          1     64     64   2048    2047
fcs1             U789C.001.DQDH231-P1-C2-T2          1     64     62   2048    2043
4. Assign a Physical FC Adapter to a Virtual Fibre Channel Adapter
$ vfcmap -vadapter vfchost0 -fcp fcs1
5. Unassign a Physical FC Adapter from a Virtual Fibre Channel Adapter
There isn't a separate command for this action - you just leave the argument after
-fcp empty:
$ vfcmap -vadapter vfchost0 -fcp
Virtual Devices: Network
1. List Shared Ethernet Adapters
 $ lsmap -all -net
 SVEA	Physloc
 ------ --------------------------------------------
 ent12	U9117.570.65E12FB-V2-C20-T1

 SEA                   ent13
 Backing device        ent3
 Physloc               U7311.D20.651372C-P1-C01-T2
2. Create a Shared Ethernet Adapter
To create a Shared Ethernet Adapter (SEA) you need:
- a physical adapter as backend: <PHYS>
- a virtual adapter as defined in the VIOS' profile: <VIRT>
- an internal VLAN ID: <VLAN>
- a second virtual adapter as defined in the VIOS' profile: <CONT>
# simple:$ mkvdev -sea <PHYS> -vadapter <VIRT> -default <VIRT> -defaultid <VLAN># Shared Ethernet Adapter Failover:$ mkvdev -sea <PHYS> -vadapter <VIRT> -default <VIRT> -defaultid <VLAN> -attr ha_mode=auto ctl_chan=<CONT>
Example: To create a Shared Ethernet Adapter on top of an virtual adapter ent11 using VLAN 20, the physical adapter ent2 as backend, and the virtual adapter ent13 for the control channel type:
$ mkvdev -sea ent2 -vadapter ent11 -default ent11 -defaultid 20 -attr ha_mode=auto ctl_chan=ent13
3. Enable SEA Load Sharing Mode
First on the primary SEA, then on the secondary:
$ chdev -dev <SEA> -attr ha_mode=sharing
4. Show SEA Satus
Let's say for the SEA ent20:
 $ entstat -all ent20 | grep '^[ ]*State'
     State: PRIMARY
Other possible states: BACKUP, PRIMARY_SH, BACKUP_SH. The states PRIMARY_SH and BACKUP_SH are indicating that Load Sharing Mode has been enabled.
5. Perform a Manual SEA Failover
To perform a failover for the SEA ent20 go to the active side ("State: PRIMARY") and type:
$ chdev -dev ent20 -attr ha_mode=standby
The SEA on the other VIO server automatically becomes active. To switch back you would type
$ chdev -dev ent20 -attr ha_mode=auto
6. List Links on Physical Ethernet Adapters
 $ netstat -cdlistats | grep -Ei "\(ent|media|link status"
 ETHERNET STATISTICS (ent3) :
 Link Status : Up
 Media Speed Selected: 100 Mbps Full Duplex
 Media Speed Running: 100 Mbps Full Duplex
7. Set a local IP Address
To configure an local IP 192.168.1.2 address to en0 use
 $ mktcpip  -hostname <HOSTNAME> \
            -inetaddr 192.168.1.2 \
            -interface en0 -start \
            -netmask 255.255.255.0 \
            -gateway <GATEWAY>
8. Remove a local IP Address
If you want to remove the IP configuration from en0, type
$ rmtcpip -interface en0